
Beats Studio Wireless Headphones How to Connect
To connect Beats Studio Wireless Headphones, turn on the headphones and enable Bluetooth on your device. Then, select Beats Studio from the list of available devices and pair it.

Beats Studio Wireless Headphones provide a convenient and high-quality listening experience suitable for various activities. With their wireless functionality, they deliver freedom of movement without compromising sound quality.
Whether you're at the gym, on the go, or working from home, the Beats Studio Wireless Headphones offer an immersive audio experience. In addition, their noise-canceling feature ensures that you can focus on your music or calls without distractions.
This versatile accessory also boasts long battery life, making it perfect for extended use. Stay tuned to discover how these headphones can enhance your audio experience.
Credit: support.apple.com
Overview Of Beats Studio Wireless Headphones
Beats Studio Wireless Headphones offer premium sound quality and convenient wireless connectivity for a superior listening experience.
Features And Specifications
- Active noise cancellation to block out external sounds.
- Includes Apple's W1 chip for seamless device switching.
- Up to 22 hours of battery life for extended usage.
- Bluetooth connectivity for wireless music streaming.
Explore the advanced features that make Beats Studio Wireless headphones stand out.
Design And Comfort
- Ergonomic over-ear design for long-wearing comfort.
- Adjustable headband for a customized fit.
- Premium finishes and materials for a stylish look.
Experience luxurious comfort and sleek design with Beats Studio Wireless headphones.
Credit: m.youtube.com
Connecting Beats Studio Wireless Headphones
Ensure seamless connectivity with Beats Studio Wireless Headphones by following these simple steps. Sync effortlessly with your devices for a dynamic listening experience, creating a hassle-free connection for your wireless beats.
Connecting Beats Studio Wireless Headphones Bluetooth technology has revolutionized the way we connect our devices and enjoy wireless audio. Beats Studio Wireless Headphones are no exception, as they provide a seamless and convenient listening experience.
In this blog post, we will walk you through the process of connecting your Beats Studio Wireless Headphones via Bluetooth and help troubleshoot any connection issues you may encounter.
Bluetooth Pairing Process
Pairing your Beats Studio Wireless Headphones with your device is quick and easy. Just follow these simple steps:
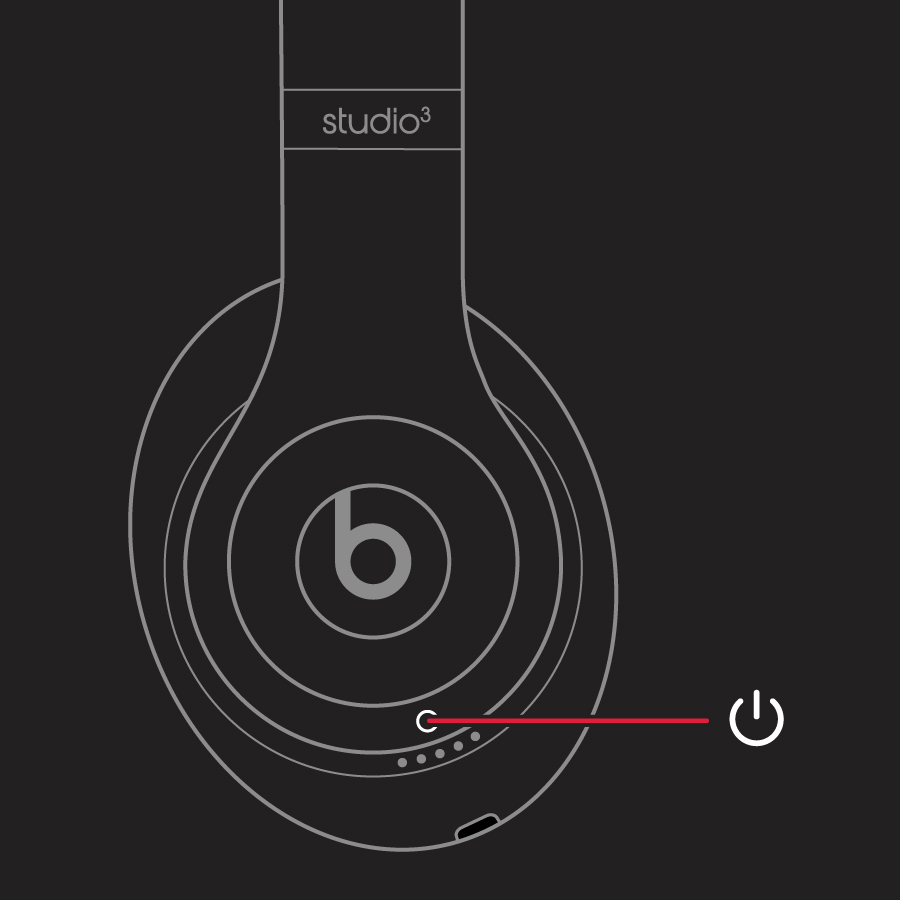
- 1. Turn on your Beats Studio Wireless Headphones by pressing and holding the power button until the LED indicator light flashes.
- 2. On your device, go to the Bluetooth settings and make sure Bluetooth is turned on.
- 3. Look for the name of your Beats Studio Wireless Headphones in the list of available devices and select it. The LED indicator light on your headphones will turn solid, indicating a successful connection.
- 4. If prompted, enter the passkey provided in the user manual or on the packaging. This passkey ensures secure communication between your headphones and your device.
- 5. Once the pairing is complete, you can start enjoying your favorite music, podcasts, or videos wirelessly through your Beats Studio Wireless Headphones.
Troubleshooting Connection Issues
Occasionally, you may encounter connection issues with your Beats Studio Wireless Headphones. Here are some troubleshooting steps to help resolve these issues:
1. Make sure your headphones are within the Bluetooth range of your device. Bluetooth technology usually works within a range of 10 meters (33 feet).
2. Ensure that your device has Bluetooth turned on and is discoverable. If necessary, toggle the Bluetooth setting off and on again.
3. Restart both your Beats Studio Wireless Headphones and your device. This can often resolve temporary connection problems.
4. Check if your headphones are already connected to another device. Disconnect them from that device before attempting to connect with a new one.
5. If you're still experiencing connection issues, try resetting your Beats Studio Wireless Headphones to their default settings. Consult the user manual for instructions on how to perform a reset.
By following these steps, you should be able to connect your Beats Studio Wireless Headphones seamlessly and troubleshoot any connection issues that may arise. Enjoy the freedom of wireless audio and immerse yourself in your favorite sounds with ease and convenience.
Optimizing Sound Quality
When it comes to enhancing the sound quality of your Beats Studio Wireless Headphones, there are a few key features to take advantage of. Customizing equalizer settings, optimizing noise cancellation functionality, and making the most out of your headphones' capabilities can greatly enhance your listening experience. Let's dive into these features to help you get the most out of your Beats Studio Wireless Headphones.
Customizing Equalizer Settings
Customizing the equalizer settings allows you to tailor the sound to your preferences. To optimize the sound output, access the equalizer settings in your preferred music app or the settings on your device. Adjust the bass, mids, and treble to suit your listening preferences. Experimenting with the equalizer settings can help you achieve the perfect sound for different music genres and audio content.
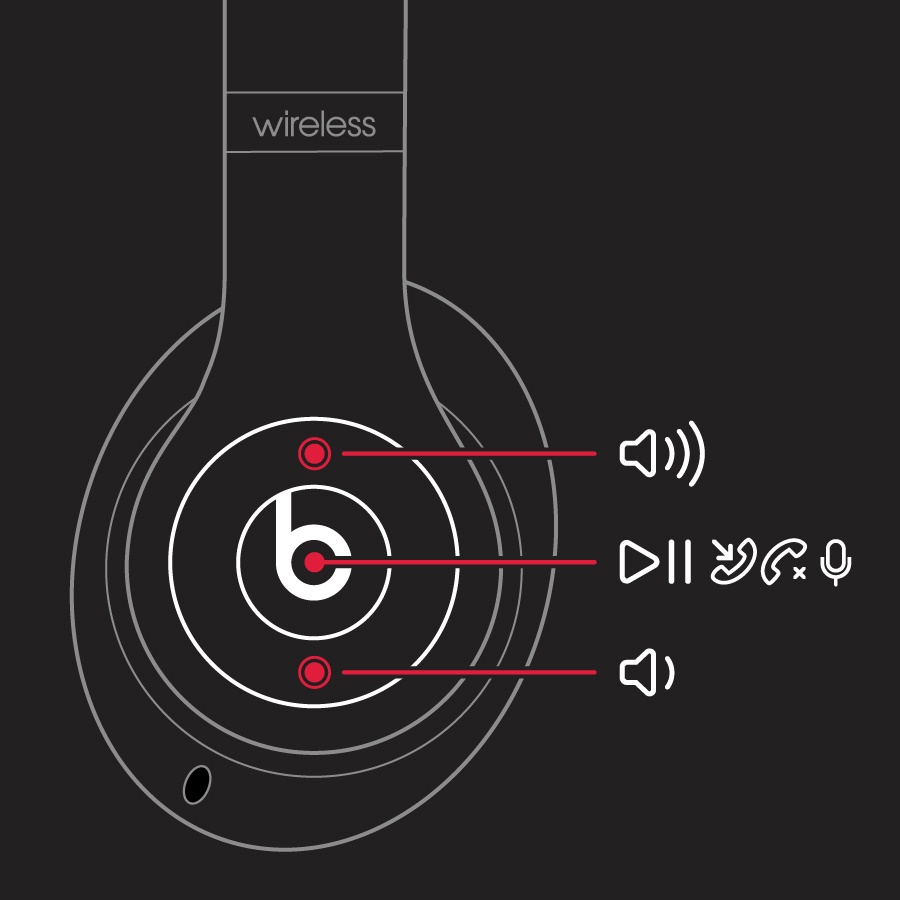
Noise Cancellation Functionality
Beats Studio Wireless Headphones are equipped with advanced noise cancellation technology to block out external distractions and immerse you in your music. Activating the noise cancellation feature ensures an uninterrupted and immersive listening experience, especially in noisy environments such as airplanes, trains, or bustling streets.
Credit: support.apple.com
Managing Battery Life
When it comes to enjoying uninterrupted music, managing the battery life of your Beats Studio Wireless Headphones is essential. With the right charging instructions and power-saving practices, you can maximize the longevity of your headphones’ battery.
Charging Instructions
To ensure optimal battery performance, remember to charge your Beats Studio Wireless Headphones regularly. Connect the included USB cable to the charging port on the headphones and a power source. Allow the headphones to charge fully before use to maximize battery life.
Conserving Power
Conserving power is crucial for extending the battery life of your headphones. Here are a few ways to conserve power:
- Turn off the headphones when not in use to prevent unnecessary battery drainage.
- Adjust the volume to an optimal level to reduce power consumption.
- Use the headphones in wired mode when possible to save wireless battery usage.
Compatibility With Devices
Welcome to our guide on Beats Studio Wireless Headphones! In this section, we'll explore the compatibility of these sleek and stylish headphones with various devices. Whether you want to pair them with your smartphone, connect them to your laptop or tablet, we've got you covered. Let's dive in!
Pairing With Smartphones
Connecting your Beats Studio Wireless Headphones to your smartphone is a breeze. Simply follow these steps:
- Make sure your headphones are charged and turned on.
- On your smartphone, go to the Bluetooth settings.
- Locate the Beats Studio Wireless in the list of available devices and select it.
- Once connected, you'll be able to enjoy your favorite music wirelessly!
With this simple process, you can easily pair your Beats Studio Wireless Headphones with your smartphone and enjoy the freedom of wireless listening wherever you go.
Connecting To Laptops And Tablets
Connecting your Beats Studio Wireless Headphones to your laptop or tablet is just as straightforward. Here's what you need to do:
- Ensure that your headphones are charged and turned on.
- On your laptop or tablet, open the Bluetooth settings.
- Look for the Beats Studio Wireless in the list of available devices.
- Select the headphones to establish a connection.
Once connected, you'll be able to enjoy your favorite movies, shows, and music with crystal-clear sound, without the hassle of tangled wires.
With the Beats Studio Wireless Headphones' compatibility with smartphones, laptops, and tablets, you have the flexibility to effortlessly connect to your favorite devices. Say goodbye to wired headphones and immerse yourself in the world of wireless audio.
Enhancing User Experience
With Beats Studio Wireless Headphones, connecting has never been easier, ensuring a seamless experience for users. By utilizing voice assistants and exploring additional features, users can elevate their audio experience to new heights.
Utilizing Voice Assistants
Voice commands play a key role in connecting Beats Studio Wireless Headphones effortlessly. Users can use Siri or Google Assistant to manage calls, change tracks, and adjust volume hands-free, enhancing convenience.
Exploring Additional Features
Noise cancellation technology in Beats Studio Wireless Headphones blocks out distractions, allowing users to immerse themselves fully in their music or calls without interruption.
Maintenance And Care
For smooth operation and optimal performance, it is important to know how to connect your Beats Studio Wireless Headphones. Follow these simple steps to ensure a seamless connection and enjoy your music wirelessly.
Maintenance and Care are critical for the longevity of your Beats Studio Wireless Headphones connectivity. Here are some essential guidelines to ensure optimal performance. Cleaning Guidelines:
- - Use a soft, dry cloth to wipe the surface of the headphones after each use.
- - Avoid using harsh chemicals or cleaning solutions which may damage the headphone's finish.
- - If necessary, lightly dampen a cloth with water to clean stubborn marks or fingerprints.
- - Do not submerge the headphones in water or expose them to excessive moisture.
- Storage Recommendations: - Store your Beats Studio Wireless Headphones in a cool, dry place away from direct sunlight.
- - Avoid leaving the headphones in extreme temperatures as it can affect the battery life and overall performance.
- - When not in use, consider placing the headphones in a protective case to prevent dust and debris buildup. Remember, proper maintenance and care will ensure that your Beats Studio Wireless Headphones continue to deliver premium audio quality.
Frequently Asked Questions For Beats Studio Wireless Headphones How To Connect
How To Connect Beats Studio Wireless Headphones To A Device?
To connect your Beats Studio Wireless Headphones, turn them on & go to your device's Bluetooth settings to pair.
Can I Connect The Beats Studio Wireless Headphones To Multiple Devices?
Yes, you can pair your Beats Studio Wireless Headphones with multiple devices and easily switch between them.
What Devices Are Compatible With The Beats Studio Wireless Headphones?
Beats Studio Wireless Headphones are compatible with various devices, including smartphones, tablets, and laptops with Bluetooth capability.
What Is The Battery Life Of Beats Studio Wireless Headphones?
The Beats Studio Wireless Headphones offer an impressive battery life of up to 22 hours for long-lasting wireless playback.
How Do I Charge The Beats Studio Wireless Headphones?
To charge your Beats Studio Wireless Headphones, simply connect the included USB cable to a power source or computer.
Conclusion
Connecting your Beats Studio Wireless headphones is a straightforward process that enhances your audio experience. By following the simple steps outlined in this blog post, you can quickly pair your headphones with various devices, such as smartphones, laptops, and tablets.
Remember, staying connected has never been easier, allowing you to enjoy your favorite music, podcasts, and videos with exceptional sound quality. Level up your audio game with Beats Studio Wireless headphones today!


